
Blink Outdoor (3rd Gen) + Solar Panel Charging Mount Review: Low‑Maintenance Smart Security for Sunny Spots
Introduction
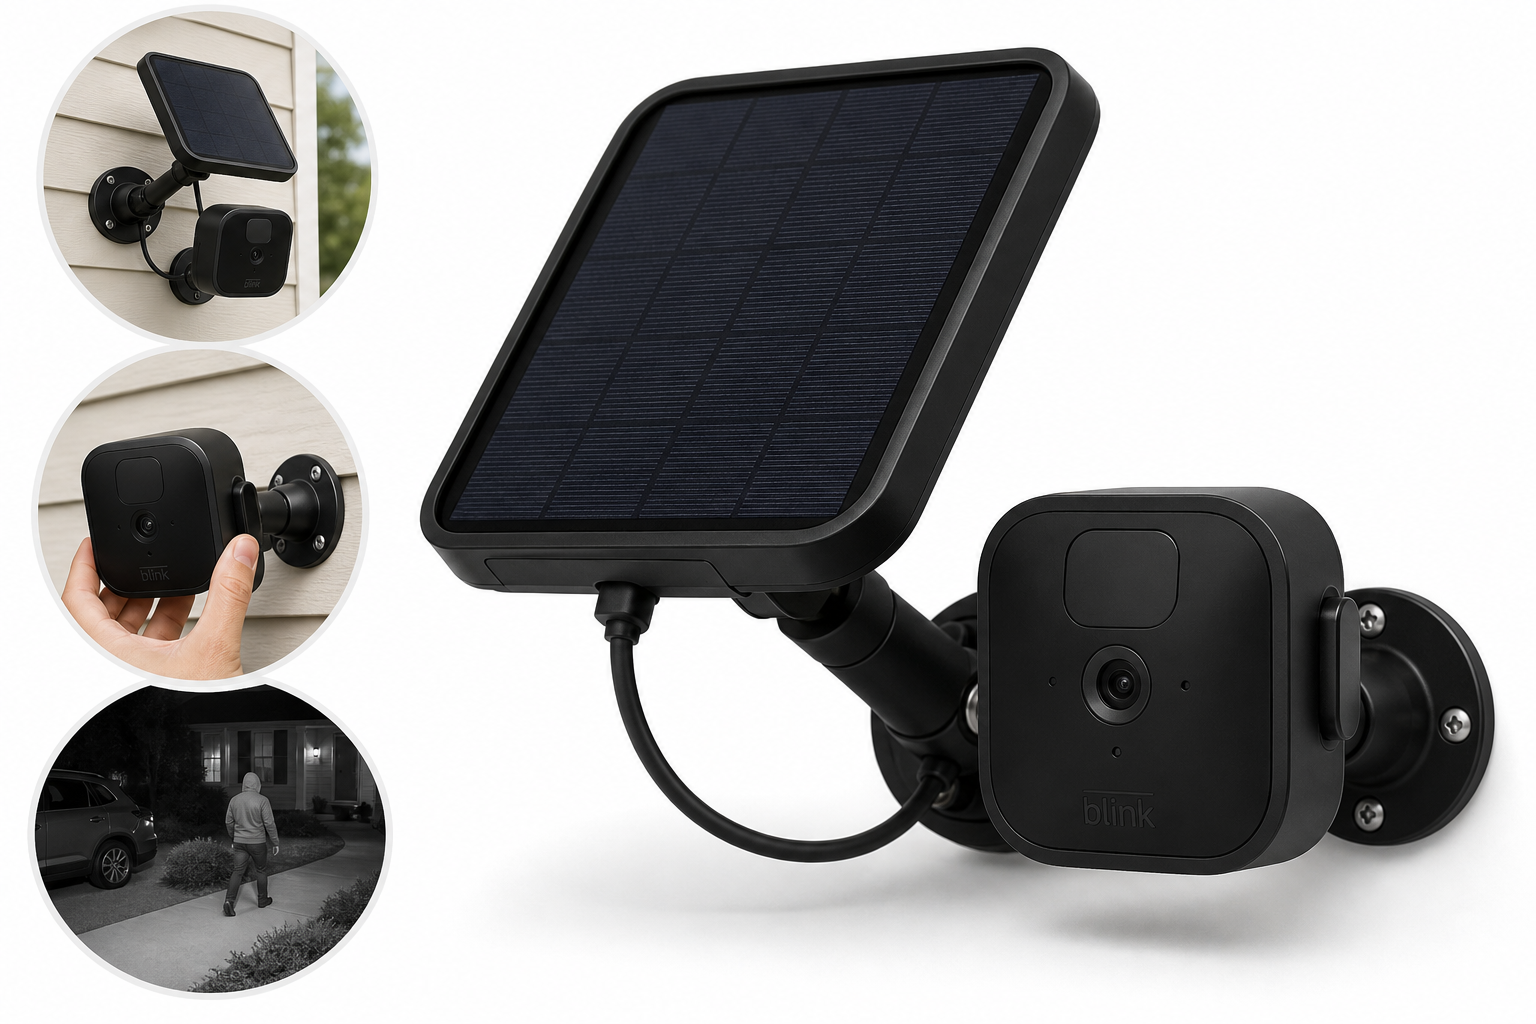
The Blink Outdoor (3rd Gen) + Solar Panel Charging Mount – Add-on camera is aimed at Blink users who want to expand their wireless home security setup while cutting down on battery swaps. Instead of relying solely on AA lithium cells, this bundle pairs the familiar Blink Outdoor (3rd Gen) camera with a purpose-built solar panel mount that houses its own rechargeable battery and connects to the camera via micro-USB.
This specific package is an add-on camera, so a compatible Blink Sync Module is required and sold separately. Once added to an existing Blink system, it behaves like any other Outdoor (3rd Gen) camera in the app, with the main difference being the solar-assisted power source.
If you’re already invested in Blink and have a camera location that gets decent sunlight, this kit is designed to be a largely hands-off, low-maintenance option, often available around $99.99.
Key Points
- Camera type: Blink Outdoor (3rd Gen) wireless add-on camera
- Power: Solar Panel Charging Mount with internal rechargeable battery plus micro‑USB connection to camera
- Video resolution: 1080p HD video with infrared night vision
- Connectivity: 2.4 GHz Wi‑Fi; requires Blink Sync Module for operation
- Usage: Outdoor-rated housing, weather-resistant design
- Placement: Solar panel mount with adjustable angles and included hardware for exterior walls or siding
- Storage options: Blink subscription-based cloud recording and/or local storage via Sync Module 2 and USB drive
- Compatibility: Designed specifically for Blink Outdoor (3rd Gen); not intended for Outdoor 4, XT, or XT2
- Key benefit: Significantly reduced battery maintenance when the panel gets adequate sun
Experience
Setup and Installation
Installation is straightforward if you’re comfortable with basic DIY tasks. You first register the Blink Outdoor (3rd Gen) add-on camera in the Blink app, then assemble and mount the solar panel bracket on an exterior surface with access to consistent sunlight.
The panel’s mounting plate can be fixed with screws (and anchors if needed) on wood, masonry, or similar surfaces. Many users also mount it on siding using third-party hooks to avoid drilling, as the panel and camera are relatively lightweight. Once the mount is in place, the micro‑USB cable from the panel is connected to the camera’s power port, and the camera snaps into the mount.
Inside the solar mount is a rechargeable battery pack. After you remove the battery pull-tab and connect everything, it typically takes a short time for the system to register external power. In the Blink app, the camera’s battery status will show external power as OK once the panel’s internal battery has charged enough to supply the camera.
App Integration and Everyday Use
In day-to-day use, the solar-powered add-on behaves like any other Blink Outdoor (3rd Gen) device. You manage motion zones, sensitivity, clip length, retrigger time, and schedules from the Blink app. The 1080p daytime image quality is clear enough for general identification of people and vehicles, with a typical wide field of view and moderate detail retention. Night vision relies on infrared, producing monochrome footage that’s usable for security monitoring, though not as sharp as some higher-end wired cameras.
Motion detection is PIR-based, so it’s sensitive to people and animals moving across the field of view rather than directly toward the camera. Proper positioning—around shoulder height and angled slightly downward—helps reduce false triggers from distant street traffic or wind-blown foliage.
The key difference with this kit is power management. When installed in a sunny location, the panel charges its internal battery, which then powers the camera through the USB connection. Under favorable conditions, this can dramatically reduce how often you need to think about batteries at all. In shadier locations or during prolonged periods of poor weather, the panel may contribute less, and the system will lean more on the camera’s internal AA cells (if installed) or gradually run down the solar mount’s battery.
Solar Performance and Reliability
As with any small, roofline‑scale solar solution, real-world results depend heavily on placement and climate. Users report the best performance when the panel:
- Has a clear, unobstructed view of the sun for several hours per day
- Is aimed generally southward (in the northern hemisphere) and tilted to catch midday sun
- Is kept free of heavy shade from trees, eaves, or nearby structures
When these conditions are met, the solar mount can keep up with typical Blink configurations—moderate motion activity and standard clip lengths—without frequent manual intervention. Heavier use cases (busy walkways, long clips, high sensitivity) or winter conditions with shorter, weaker sunlight can narrow the margin, so settings may need to be tuned for power efficiency.
Build Quality and Design
Physically, the Blink Outdoor (3rd Gen) camera retains its compact, minimal aesthetic with a black, weather-sealed housing. The solar panel mount is sized and styled to match, creating a visually cohesive unit once everything is snapped together.
The panel is fixed to an adjustable bracket, allowing both the camera angle and panel angle to be tweaked independently to a degree. This is useful when you want the camera trained on a doorway or driveway while still optimizing the panel’s exposure to sunlight.
Weather resistance is adequate for typical outdoor use, with the unit designed to withstand rain and temperature swings expected in residential environments. As with all electronics mounted outside, extreme conditions (very cold winters or intense, prolonged sun and heat) can affect long-term battery health, but the overall design is suited to year-round deployment.
Pros
- Low-maintenance power solution when installed in a sunny location, significantly reducing or eliminating manual battery changes
- Clean integration with existing Blink ecosystems via the Sync Module
- Wire-free placement aside from the short USB connection between the panel and camera, preserving installation flexibility
- Full Blink app feature set, including motion zones, notification control, and scheduling
- Weather-resistant construction suitable for typical outdoor residential conditions
- Adjustable mounting hardware to better align both camera framing and solar orientation
- Works well for hard-to-access locations (e.g., near rooflines or over garages) where ladder access for frequent battery changes would be cumbersome
Cons
- Requires an existing Sync Module, making it unsuitable as a true stand-alone first camera
- Panel placement is critical; poor sunlight or heavy shade can limit the benefits of solar charging
- Only officially supports Blink Outdoor (3rd Gen), not earlier XT/XT2 models or newer Outdoor 4 models
- Night vision is functional but not exceptional compared with some higher-priced competitors
- As an add-on kit, the package price (often around $99.99) may feel high compared with basic battery-only add-on cameras if you don’t truly need solar
Verdict
The Blink Outdoor (3rd Gen) + Solar Panel Charging Mount – Add-on camera is a sensible upgrade for existing Blink users who want to reduce the ongoing hassle of battery maintenance, particularly at locations that are physically hard to reach or receive ample sunlight year-round.
Its value proposition is straightforward: you get the familiar, easy-to-use Blink Outdoor (3rd Gen) experience, plus a dedicated solar mount that, when installed correctly, can turn it into a largely hands-off device. The trade-offs mostly revolve around ensuring good solar exposure and accepting that this kit is tied specifically to the 3rd Gen Outdoor hardware and a required Sync Module.
If you already own a Blink system and have a camera location that sees strong midday sun, this bundle is an appealing, tidy way to extend coverage without committing to wired power or regular ladder trips. For more shaded areas, or if you’re just starting from scratch with home security, you may want to compare this add-on kit at $99.99 with complete starter packages or wired alternatives to ensure it fits your long-term plans.